GravityView is a premium WordPress plugin designed to extend the functionality of Gravity Forms, one of the most popular form plugins for WordPress. GravityView allows users to display and manage form submissions on the front end of their WordPress website in a visually appealing way. It is ideal for situations where you want to display form data (such as user submissions, surveys, or contact form entries) on your website in a structured and customizable format.
Key Features of GravityView:
- Display Gravity Forms Entries on the Frontend:
- GravityView allows you to display the form submissions from Gravity Forms on the front end of your website. This is particularly useful for creating directories, user-submitted content, or display forms like event registrations, testimonials, and more.
- Multiple View Layouts:
- The plugin offers several display layouts (or "views") to show form entries. Some of the popular view types include:
- Table View: Displays form data in a table format.
- List View: Displays entries in a list format.
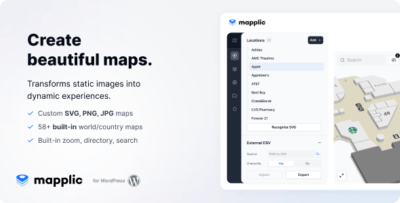
- Map View: Allows you to display form entries with location-based data on a map.
- Single Entry View: Show details of a single form submission.
- Card View: Display data in an attractive card format, perfect for portfolios, team members, and more.
- The plugin offers several display layouts (or "views") to show form entries. Some of the popular view types include:
- Advanced Filtering and Sorting:
- GravityView allows visitors to filter and sort form entries, making it easy to navigate through large amounts of data. You can enable search filters, category filters, or even custom sorting based on form fields.
- Frontend Editing of Entries:
- Users can edit their submissions directly from the frontend. This is a valuable feature for forms where users need to update or modify their previously submitted data without accessing the backend.
- Conditional Logic:
- The plugin supports conditional logic for showing or hiding specific fields based on user input. This can be helpful for customizing the display of form data dynamically.
- Approval Workflow:
- With GravityView, you can set up approval workflows, ensuring that form entries are reviewed before being published on the front end. This is ideal for scenarios where user submissions need to be moderated.
- Customizable Layouts with Widgets:
- You can customize the appearance of your entries using GravityView's widgets. This allows for easy styling without needing to write custom code. You can also use themes or the built-in CSS editor to match the display to your site's design.
- Export Data:
- Admins can export form entries displayed via GravityView in CSV format. This makes it easy to download and process form submissions outside of WordPress.
- Access Control:
- GravityView offers granular control over who can view, edit, and manage form entries. You can control access to views and entries based on user roles, making it perfect for member-based websites.
- Custom Templates:
- GravityView comes with pre-built templates for each view type, but you can also create your own custom templates to fit your website’s unique style. This makes the plugin very flexible and adaptable to a wide range of use cases.
- Mobile Responsive:
- Views created with GravityView are fully responsive, ensuring they look great on both desktop and mobile devices. This feature is important for user experience and engagement on all platforms.
- Integration with Other Gravity Forms Add-Ons:
- GravityView works seamlessly with other Gravity Forms add-ons, such as those for payment gateways, email marketing services, and more, enabling you to extend the functionality even further.
- Multilingual Support:
- The plugin supports multilingual sites through WPML or Polylang integration, making it easy to create sites in multiple languages.
Ideal Use Cases for GravityView:
- User Submissions:
- Display user-submitted content such as reviews, testimonials, event registrations, and portfolios.
- Perfect for community-driven sites, where users contribute information that needs to be publicly displayed.
- Directories:
- Create and manage business or service directories where users can submit their own listings (e.g., businesses, professionals, members).
- It can also be used to display directory listings on a map, which is useful for local businesses or services.
- Event Registration:
- Display information on event registrations, speaker details, attendee lists, etc., and enable frontend editing of event entries.
- Job Listings:
- Post job submissions in a job listing directory where both job seekers and employers can submit, view, and edit job posts.
- Customer Portals:
- Set up customer portals where clients can submit forms (e.g., orders, support requests) and track or edit their submissions in a structured way.
- Surveys or Polls:
- Use GravityView to display survey results or polls in a user-friendly format, showing responses in tables, charts, or on a map.
- Real Estate Listings:
- For real estate websites, use GravityView to show listings of properties submitted by agents or property owners.
How to Set Up GravityView:
- Install GravityView Plugin:
- Install GravityView by uploading the plugin files through the WordPress Dashboard under Plugins > Add New. Activate the plugin after installation.
- Create or Configure a Gravity Form:
- You need a form created with Gravity Forms. Create a form or use an existing one that collects the data you want to display.
- Create a View:
- After creating a form, go to the GravityView settings and click on "Add New View." You will choose which form you want to display and select the type of view (e.g., table, list, map, card).
- Customize the View:
- Customize how you want the form submissions to appear on the frontend. You can choose which fields to display, apply filters, and use the drag-and-drop editor to arrange the layout.
- Set Permissions:
- Define who can view and edit the form entries on the frontend. You can limit access to logged-in users, specific roles, or completely public views.
- Embed the View:
- Once you're happy with the view, you can embed it on any page or post using the GravityView shortcode.
- Launch Your Site:
- Once the view is ready, you can publish it and make it live. Users can now submit their data via Gravity Forms, and the entries will be displayed based on your customized view.


![Booknetic - Appointment Booking & Appointment Scheduling & Calendar reservation [SaaS]](https://gplpixel.com/wp-content/uploads/2024/06/Booknetic-Appointment-Booking-Appointment-Scheduling-Calendar-reservation-SaaS-400x203.jpg)