")


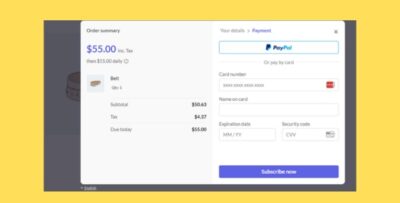
WooCommerce Clover (First Data Payeezy Gateway) refers to the integration of the Payeezy Gateway (previously known as First Data) with WooCommerce, allowing you to securely process payments for your online store. Clover is a point-of-sale (POS) system owned by First Data, and Payeezy is the name of their online payment gateway service. Payeezy enables you to accept credit card payments, mobile payments, and other forms of online transactions on your WooCommerce store.
This integration connects WooCommerce with Payeezy, allowing you to manage online payments easily within your WordPress-based WooCommerce store.
Benefits of WooCommerce Clover (Payeezy) Integration:
- Secure Payment Processing: Payeezy is a PCI-compliant gateway that ensures secure handling of sensitive payment information.
- Multiple Payment Options: Accept credit cards, debit cards, Apple Pay, Google Pay, and other payment methods.
- Easy Integration: The integration provides a seamless way for WooCommerce store owners to start processing payments online.
- Global Reach: Payeezy supports international transactions, so you can process payments from customers around the world.
- Recurring Billing: If you run a subscription-based service, Payeezy supports recurring billing, making it easy to manage subscription payments.
How to Integrate WooCommerce with Payeezy (First Data Clover):
- Install the Payeezy Payment Gateway Plugin for WooCommerce: You can either download a free plugin from the WooCommerce marketplace or use a third-party plugin provider. A popular option for integrating Payeezy with WooCommerce is the Payeezy WooCommerce Payment Gateway plugin.Steps:
- Go to your WordPress Dashboard.
- Navigate to Plugins > Add New.
- Search for "Payeezy WooCommerce Payment Gateway" or "First Data Payeezy Gateway".
- Install and activate the plugin.
- Set Up the Payeezy Gateway: After activation, you will need to configure the Payeezy gateway to connect with your WooCommerce store.Steps:
- Go to WooCommerce > Settings.
- Click on the Payments tab.
- Look for Payeezy (or First Data Payeezy), and click Manage to set it up.
- You will need the following information:
- API Key: This is provided by Payeezy/First Data.
- Merchant ID: Also provided by Payeezy/First Data, linked to your merchant account.
- Transaction Key: Generated within your Payeezy account (you may need to log in to your Payeezy account to get this).
- You can also configure settings like payment method names, whether to enable test mode, and other preferences.
- Configure Payment Settings:
- Set up Payment Authorization (whether payments should be authorized immediately or placed on hold until you manually process them).
- Choose whether to enable the Sandbox Mode for testing (this helps ensure everything is working before going live).
- You can also enable options for debugging to help you troubleshoot any issues with payments.
- Enable Additional Payment Methods: Payeezy supports several payment methods like credit cards, debit cards, Google Pay, and Apple Pay. You can enable these options during setup.
- Check the Enable Google Pay / Apple Pay option if you'd like to support these mobile payment methods.
- Configure 3D Secure (3DS) for additional security, which is often required by some card issuers.
- Test the Payment Gateway: Before allowing customers to pay via Payeezy on your live site, ensure the setup works by running a test transaction:
- Enable Sandbox Mode and make a test purchase using a test credit card provided by Payeezy.
- Confirm that the payment is processed correctly and that you receive an appropriate response.
- Once you’re satisfied with the test results, switch to live mode.
- Go Live: After testing, disable Sandbox Mode and set the gateway to live. Your store will now be ready to accept payments via Payeezy through the WooCommerce platform.
Common Features of Payeezy (First Data) Integration for WooCommerce:
- Real-time Payment Processing: Customers can complete transactions immediately.
- Order Tracking: WooCommerce integrates Payeezy with order statuses, making it easier to manage orders.
- Automatic Email Notifications: Customers will receive automated payment confirmation emails after completing a transaction.
- Transaction Logs: View transaction logs in your WooCommerce admin panel for a better overview of successful or failed transactions.
Troubleshooting Common Issues:
- Payment Failures: If payments are not processing correctly, check that your API keys and Merchant ID are entered correctly in the settings.
- Sandbox Mode Not Switching: Ensure you are using the correct live API keys when switching to production/live mode.
- Gateway Compatibility: Ensure the plugin you are using is updated to the latest version, as outdated plugins can cause issues with payment processing.


![Booknetic - Appointment Booking & Appointment Scheduling & Calendar reservation [SaaS]](https://gplpixel.com/wp-content/uploads/2024/06/Booknetic-Appointment-Booking-Appointment-Scheduling-Calendar-reservation-SaaS-400x203.jpg)