
WS Form PRO – Authorize.Net Accept Integration enables you to seamlessly integrate WS Form PRO, a powerful WordPress form builder plugin, with Authorize.Net, a popular online payment gateway. This integration allows you to securely process payments for products, services, or donations directly through your WordPress forms. It simplifies the payment process for users and ensures smooth transactions without the need for a separate checkout page.
Key Features of WS Form PRO – Authorize.Net Accept Integration:
- Seamless Payment Integration:
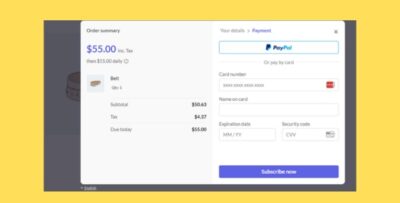
- Direct Payment Processing: With this integration, users can securely make payments through your WS Form PRO forms without being redirected to a separate payment page. The payment is processed via Authorize.Net, and users stay on your website throughout the transaction.
- Single-Page Checkout: Users can submit their form and complete the payment process all in one place, offering a more streamlined experience.
- Multiple Payment Methods:
- Credit and Debit Cards: Authorize.Net supports a variety of credit and debit cards, including Visa, MasterCard, American Express, and Discover. Users can choose their preferred payment method.
- ACH Payments: In addition to card payments, you can accept eCheck (ACH) payments for users who prefer to pay directly from their bank accounts.
- Apple Pay, Google Pay, and PayPal: Authorize.Net also supports alternative payment methods, such as Apple Pay, Google Pay, and PayPal, allowing users to pay using digital wallets.
- Secure Payment Processing:
- PCI Compliance: Authorize.Net is a PCI DSS-compliant gateway, ensuring that all payments are processed securely. Sensitive payment information is never stored on your WordPress site.
- Tokenization: Authorize.Net uses tokenization to protect users' payment details by substituting sensitive card information with a unique token, reducing the risk of fraud.
- SSL Encryption: The payment form uses SSL encryption to ensure that the data exchanged between the user and your server is secure.
- Dynamic Payment Options:
- Conditional Logic: With WS Form PRO's conditional logic, you can display payment options based on user selections or form responses. For example, you can show different payment methods for different types of purchases or users.
- Multiple Payment Options: You can configure the form to allow multiple payment methods, giving users the flexibility to choose the one they prefer, whether it's a credit card, ACH, or digital wallet.
- Refund and Transaction Management:
- Manage Transactions: Once a payment is successfully processed, you can view transaction details and manage them directly through the Authorize.Net portal. You can issue refunds, view payment history, and track transaction statuses.
- Partial and Full Refunds: You can issue refunds for a full or partial amount of a transaction directly from your Authorize.Net account, depending on your business needs.
- Payment Confirmation and Receipt:
- Automatic Payment Confirmation: After a successful payment, users can be automatically redirected to a thank you page, or you can display a confirmation message on the same page.
- Email Receipts: You can set up email notifications to automatically send payment receipts to both the user and the admin. These receipts will contain the transaction details and confirmation of payment.
- Multi-Currency Support:
- Currency Conversion: Authorize.Net supports multiple currencies, allowing you to accept payments in different currencies based on the user’s location or your business needs. This feature is helpful for businesses that cater to international customers.
- Recurring Payments (Subscriptions):
- Subscription Plans: The integration supports recurring billing for subscription-based services. You can set up subscription forms that allow users to sign up for recurring payments, with the ability to manage billing cycles, subscription amounts, and frequency.
- Automatic Billing: Authorize.Net will handle recurring billing automatically, ensuring that users are charged on schedule without requiring manual intervention.
- Easy Setup and Configuration:
- No Coding Required: Setting up the integration between WS Form PRO and Authorize.Net is easy and doesn’t require coding skills. You simply enter your Authorize.Net API credentials (API Login ID and Transaction Key) into the plugin settings.
- Form Configuration: After configuring the Authorize.Net integration, you can add the payment fields to your form, set up the payment amount, and map the form fields accordingly.
- Customizable Payment Form:
- Custom Fields: You can customize your payment form by adding additional fields, such as billing address, shipping information, or coupon codes, depending on your business needs.
- User Experience: With WS Form PRO’s drag-and-drop form builder, you can design your payment forms to match your website’s branding and offer a seamless user experience.
Benefits of WS Form PRO – Authorize.Net Accept Integration:
- Streamlined Payment Process:
- The integration makes the payment process smooth and efficient by allowing users to make payments directly within your form without navigating to external payment gateways. This reduces friction in the checkout process, which can lead to higher conversion rates.
- Secure Transactions:
- Authorize.Net’s PCI compliance and tokenization ensure that user payment information is processed securely, reducing the risk of data breaches or fraud. This boosts customer confidence when making payments on your site.
- Flexible Payment Options:
- The integration offers multiple payment options, including card payments, ACH, and digital wallets, providing users with the flexibility to choose their preferred payment method. This can increase customer satisfaction and improve overall sales.
- Recurring Billing:
- For businesses that offer subscription-based services, the recurring billing feature is a significant benefit. The ability to manage recurring payments and automatically charge users on a set schedule makes it easier to handle subscription-based revenue.
- Easy Transaction Management:
- Through the Authorize.Net portal, you can easily manage and track all transactions, issue refunds, and resolve payment issues directly from your account.
- Customizable Forms:
- With WS Form PRO’s intuitive drag-and-drop builder, you can create highly customized payment forms to suit your business needs. Whether you're selling products, collecting donations, or offering services, you can tailor your payment form to capture all necessary details.
- International Payments:
- Accepting multiple currencies with Authorize.Net is an important feature for businesses that cater to a global audience. This integration allows you to manage payments in a variety of currencies, expanding your reach to international customers.
- No Need for Separate Checkout:
- By embedding the payment form directly into your website, users don’t have to leave the site to complete their payment. This leads to a more seamless and professional user experience.
How to Set Up WS Form PRO – Authorize.Net Accept Integration:
- Install WS Form PRO:
- Install and activate the WS Form PRO plugin on your WordPress site. Ensure that you have a WS Form PRO license to access the Authorize.Net integration features.
- Create an Authorize.Net Account:
- If you don’t already have an Authorize.Net account, sign up for one. Once your account is set up, you’ll need to obtain the API Login ID and Transaction Key from your Authorize.Net account.
- Configure Authorize.Net API Credentials:
- Go to the WS Form PRO settings and locate the Authorize.Net integration section. Enter your API Login ID and Transaction Key from your Authorize.Net account to link your payment gateway with the form.
- Create a Payment Form:
- Use the WS Form PRO form builder to create your payment form. Add necessary fields like credit card information, billing address, and payment amount. You can also include additional fields like user information or special requests.
- Set Up Payment Amounts:
- Configure the payment amount field to match the product, service, or subscription you are charging for. You can set fixed amounts, dynamic calculations, or use conditional logic to change the amount based on user input.
- Customize Payment Options:
- Customize your payment form to offer different payment options (credit card, ACH, digital wallets) depending on your needs. Use conditional logic to show or hide options based on user selections.
- Test the Integration:
- Before launching the form, test the payment integration to ensure that transactions are being processed correctly. Use Authorize.Net’s sandbox mode for testing without making real payments.
- Publish the Form:
- Once everything is configured and tested, embed the payment form on your website and start accepting payments via Authorize.Net through your WS Form PRO form.


![Booknetic - Appointment Booking & Appointment Scheduling & Calendar reservation [SaaS]](https://gplpixel.com/wp-content/uploads/2024/06/Booknetic-Appointment-Booking-Appointment-Scheduling-Calendar-reservation-SaaS-400x203.jpg)